StackCheats
WSO2 API Manager & Okta
WSO2 API Manager & Okta as Third-Party Keymanager
December 21, 2019

Intro
This medium walks-through how to configure Okta IdP as third-party Key Manager with WSO2 API Manager
NOTE: Tested versions are WSO2 APIM v2.6
Guide
We will be swimming through the following steps
- Create an Okta Developer account
- Create an Authorization Server in Okta
- Create an Okta Application
- Configure Okta Extensions with WSO2 API Manager
Okta
Okta Developer Account
Our very first step will be to create an Okta Developer account to test and trial our Key Manager configurations.
Navigate to https://developer.okta.com and create a new Developer account to enjoy free trial on using Okta cloud IdP.
Okta Authorization Server
After successful account creation, now we have to create and register an Authorization server in Okta to communicate and to perform authorization flows.
In the Okta developer portal navigate to API > Authorization Servers (refer to the attached screen-shot)

We will be looking at a similar page as follows with a default Authorization server created in Okta.
For security concerns, all attached screenshots are masked
We can either create a new Authorization server or we can continue using the default Authorization server to configure Okta. Therefore, we will be continuing our configurations with the Default Authorization Server created by Okta…

Select the default Authorization server and click on the Scopes tab to create a Default Scope for the defined Authorization Server. Click on Add Scope and prompt the following
- Name:
default - Description:
Default Scope - Default Scope:
true - Metadata:
true
and click Create to create the Default scope.

Next, select the Tokens tab to create a new API Token for WSO2 API Manager to communicate with our Okta server.

Click on Create Token and enter a name for the Token and copy and save the generated token value for future references. From now onwards, We will be referring to the token as Okta API Token.

Okta Application
Next, we have to create a client application in the Okta IdP to acquire the Consumer secrets to communicate with the Server.
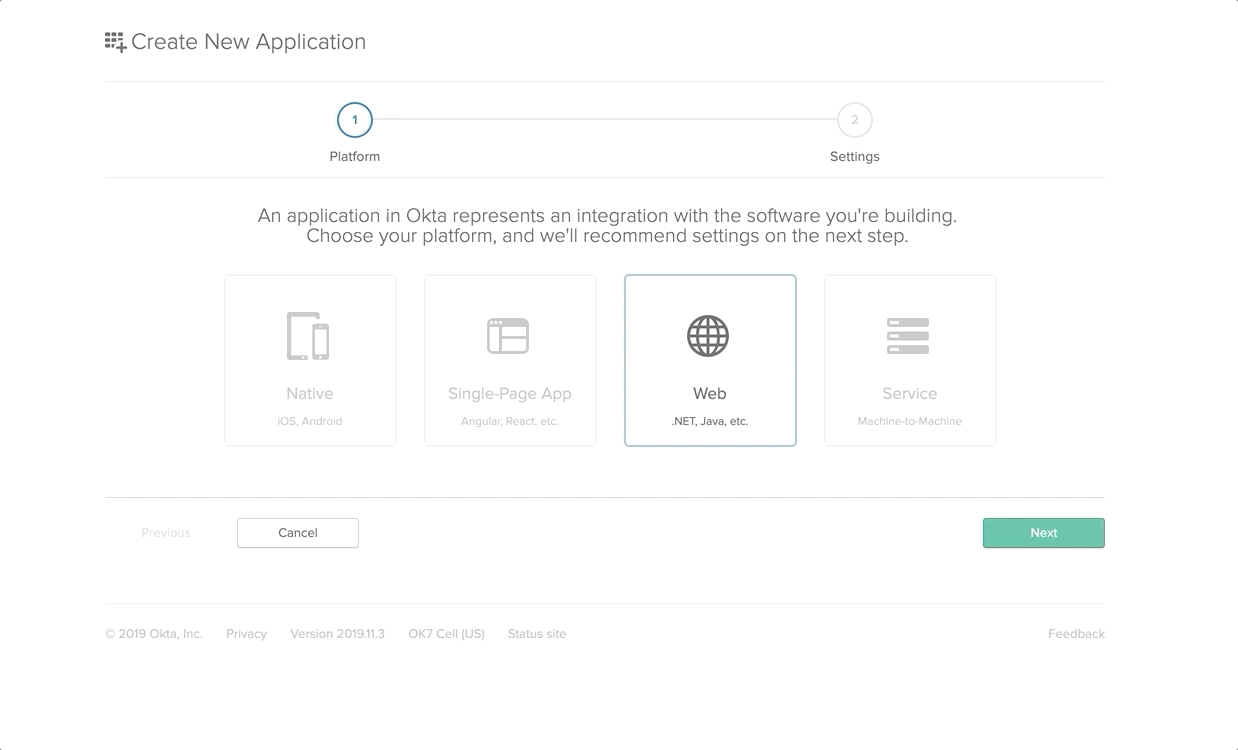
Select the Applications from the top navigation bar and then select Add Application to create one.

On the next UI, select the platform as Web and click Next. Enter the Application name and tick the Client Credentials under Grant Type Allowed section and Done.
After the successful creation of the Application, copy both the Consumer Key and Consumer Secret for future references.
WSO2 API Manager
Okta Extension
Clone or download the WSO2 API Manager Okta extension implementation from here.
APIM Keymanager Okta
Okta key-manager implementation for WSO2 API Manager
Navigate to the /artifacts folder in the root of the project to find the pre-built okta extension JAR artifacts and other related configuration artifacts. Moreover, you are welcomed to build the okta extension JAR artifact by building the project.
Copy and place the oktaoauthclient-x.x.x.jar inside the <APIM>/repository/components/lib directory.
API Manager XML
Download the WSO2 APIM v2.6 pack, extract and navigate to <APIM>/repostiry/conf/api-manager.xml to configure third-party Key Manager.
Uncomment the APIKeyManager configuration block in the api-manager.xml and edit/add the following
<APIKeyManager><KeyManagerClientImpl>org.wso2.okta.client.OktaOAuthClient</KeyManagerClientImpl><Configuration><oktaInstanceUrl>{Okta Instance URL}</oktaInstanceUrl><authorizationServerId>{Okta Authorization Server Name/ID}</authorizationServerId><apiKey>{Okta Authorization Server API Token}</apiKey><client_id>{Okta Application Client ID}</client_id><client_secret>{Okta Application Client Secret}</client_secret></Configuration></APIKeyManager>
Given below is a sample configuration
<APIKeyManager><KeyManagerClientImpl>org.wso2.okta.client.OktaOAuthClient</KeyManagerClientImpl><Configuration><oktaInstanceUrl>https://dev-12345.oktapreview.com</oktaInstanceUrl><authorizationServerId>default</authorizationServerId><apiKey>00adc_bXcT123456789</apiKey><client_id>0o2fg123456789gfL0h7</client_id><client_secret>BwhHU123456789_wpKQg</client_secret></Configuration></APIKeyManager>
Store Sub-Theme
As of the next step, we will be configuring the Store portal theme to revamp the Application generation UI to support Okta connected parameters and input fields.
Navigate to the <OktaProject>/artifacts/store directory and copy and place/replace the locale_default.json into <APIM>/repository/deployment/server/jaggeryapps/store/site/conf/locales/jaggery directory.
Copy the okta theme folder and place it inside the <APIM>/repository/deployment/server/jaggeryapps/store/site/themes/wso2/subthemes directory.
Open up the <APIM>/repository/deployment/server/jaggeryapps/store/site/conf/site.json and declare the okta as a sub-theme by making the following changes
{"theme": {"base": "wso2","subtheme": "okta"}...}
🎉 Voila!!! 🎉
Now we have successfully configured Okta as a third-party Key Manager with the WSO2 API Manager. Let’s dive into a test-drive.
Test Drive with Okta
Let’s start the WSO2 API Manager server by navigating to <APIM>/bin directory and executing the following based on your environment
# linux./wso2server.sh# windowswso2server.bat
After a successful startup, direct to https://<ip>:9443/publisher and log in with the admin credentials
- Username:
admin - Password:
admin
and deploy a sample API for our test drive (let’s deploy the one and only PizzaShack API).
Next, direct to the Store portal by routing to https://<ip>:9443/store and let’s sign-in with the above-mentioned admin credentials.
Steer to Applications > Add Application to create a new Store Application.
By default, there will be a Default Application created (once logged in) for each and every user who has the
internal/subscriberrole and permissions

Give inputs to all required fields and click on Add to create the Application.

After the successful creation of our demo application, let’s direct to Production Keys tab to generate Consumer Secrets and Access Tokens using Okta third-party Key Manager.
A Quick Glance on the Generation Flow
At the generation of
Production KeysandSandbox Keysof an Application, the APIM will communicate with the configured Okta IdP to create a dynamic-client using the DCR (Dynamic Client Registration) endpoint. Upon successful creation, Okta responds back to the APIM Server with the populated metadata to store and to communicate again with Okta to generate the access tokens to invoke the APIs.Please follow the given instructions in here to change the endpoints of Token, and Revoke endpoints to point to the Okta server.
All created dynamic-clients will follow the naming structure as
{ApplicationName_[PRODUCTION|SANDBOX]}to keep track of the created clients based on the Key Type
Provide the following at the prompted UI to generate the Consumer keys
- Callback URL:
https://localhost - Application Type:
web - Response Type:
code,token,id_token - Token Endpoint Auth Method:
client_secret_basic - Token Scope:
default - Token Grant Type:
client_credentials

Upon successful generation of the key, the APIM server will prompt a similar UI as following
Please make sure to note the generated Consumer Key and Consumer Secret because as this will be only displayed one time

If we navigate to the Okta Dev portal, there we can see a new application with the name OktaDemoApplication_PRODUCTION as follows

As of next step, copy the generated access token and invoke the deployed sample PizzaShack API.
Keep Stacking !!!