StackCheats
WSO2 API Manager & Keycloak SAML SSO
A Guide: Configure SAML Federation & SSO between WSO2 API Manager & Keycloak
April 12, 2020
Greetings Everyone !!! 👋
In this medium, I will be 🚶walking through on how to configure SAML Federated Authentication & SSO flow between WSO2 API Manager and Keycloak including JIT (User) Provisioning.
In my previous mediums, I have used WSO2 API Manager 2.6 & WSO2 Identity Server as Key Manager 5.7 to achieve the SAML2 SSO Federated authentication flows.
Today, I will be using only the API Manager 2.6 pack and the Out-Of-The-Box features to achieve the requirement
As out-of-the-box, the WSO2 API Manager 2.6 provides a platform to configure SAML2 Federation.
But, please note that it is advised (best-practice) to use WSO2 Identity Server as Key Manager to perform Federated Authentication with External Identity Providers in Production grade environments.
Let’s break-in…
🔐 Keycloak
Let’s start our configurations from the External Identity Provider.
I hope you already have an active Keycloak server up and running. If not please follow the below section to download and start a Keycloak server in your environment.
Starting-Up Keycloak
Click Here to download the Keycloak standalone distribution to your environment. Extract the archive and navigate to the <keycloak>/bin directory and execute the following command to start the Keycloak server …
Keycloak
Keycloak is an open-source identity and access management solution
# move to bin directory and execute the following# unixsh standalone.sh# windowsstandalone.bat
Then, fire-up your favorite browser and go to http://localhost:8080/auth. In the prompted page, register an admin user for our Keycloak server.
& Done … simple as that 👏 👏
👉 You can follow up on the following Doc to get started with the Keycloak server …
Getting Started Guide
This guide helps you get started with Keycloak
✋ SAML 2.0 Metadata
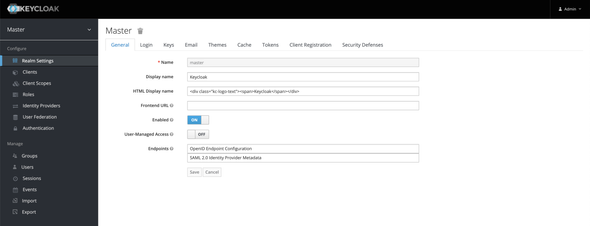
After a successful log-in to the Keycloak server with our admin user, you will be looking into a similar UI as follows
Click on the SAML 2.0 Identity Provider Metadata to get the required configurations metadata.
Save the metadata as we will be using that in the following sections to configure Federated Identity Provider.
✋ SAML2 Client Registration
Click on the Clients under Configure to list all the existing registered clients of Keycloak Server. You will be looking into a similar screen as follows
We will be using the existing Master realm to create required Clients, Users, and Roles in the Keycloak server
Select the Create button to add a new client. Set the following
- Client ID:
wso2apim-saml - Client Protocol:
saml
and Save.
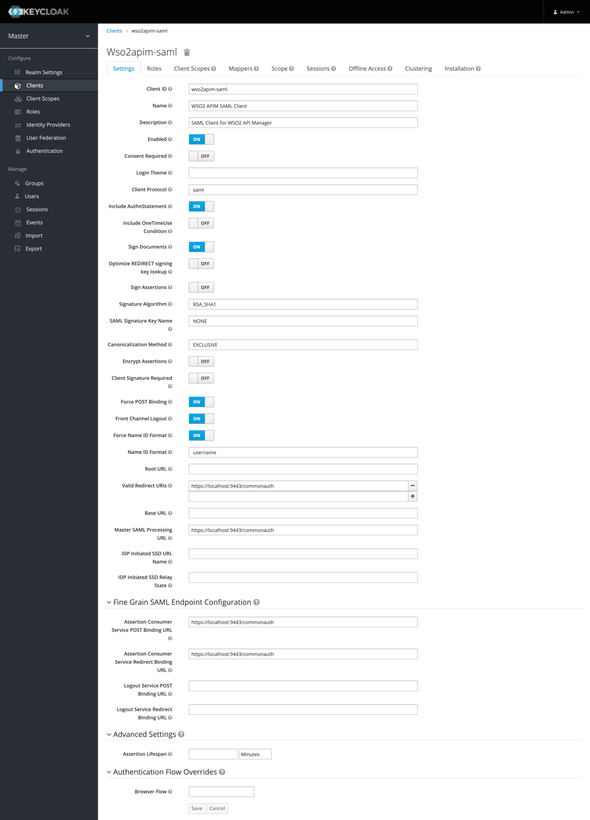
In the next screen, add the following to configure our wso2apim-saml client in the Keycloak
- Name:
WSO2 APIM SAML Client - Enabled:
true - Client Protocol:
saml - Include AuthnStatement:
true - Sign Documents:
true - Signature Algorithm:
RSA_SHA1 - SAML Signature Key Name:
NONE - Canonicalization Method:
EXCLUSIVE - Force POST Binding:
true - Front Channel Logout:
true - Force Name ID Format:
true - Name ID Format:
username - Valid Redirect URIs:
https://localhost:9443/commonauth - Master SAML Processing URL:
https://localhost:9443/commonauth
and under Fine Grain SAML Endpoint Configuration
- Assertion Consumer Service POST Binding URL:
https://localhost:9443/commonauth - Assertion Consumer Service Redirect Binding URL:
https://localhost:9443/commonauth
and Save.
Next, click on the Roles tab to create a role in Keycloak server representing the Subscriber role in the WSO2 API Manager
Click on Add Role to create a new Role and fill the following …
- Role Name:
subscriber
and Save
User Registration
We have now successfully configured our APIM SAML Client wso2apim-saml in the Keycloak Server. Next, we will be creating a new user to do our test runs.
Select the Users under the Manage section in the Left Navigation Panel and you will find a similar screen as follows
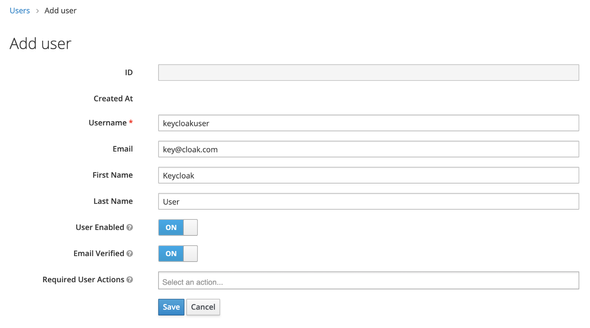
Smash the Add User button and feed the following
- Username:
keycloakuser - Email:
key@cloak.com - First Name:
Keycloak - Last Name:
User - User Enabled:
true - Email Verified:
true
and Save.
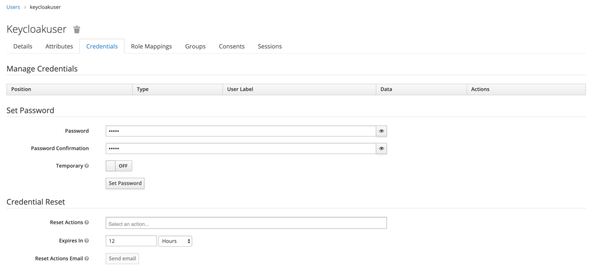
Move to the Credentials tab and enter a password for the created user. Disable the Temporary Password and click on the Set Password.
Then, move to the Role Mappings tab to map our Subscriber role with the newly created User.
Select the wso2apim-saml client in the Client Roles dropdown and then select the subscriber roles under the Available Roles section and click on the Add Selected to assign it.
Now, we have successfully created a temp user to perform our test runs. Next, we want to configure the scopes which are related to SAML in the Keycloak server to send all assigned Roles.
SAML Scope for Roles
Select the Client Scopes listed under Configure section and Edit the role_list scope.
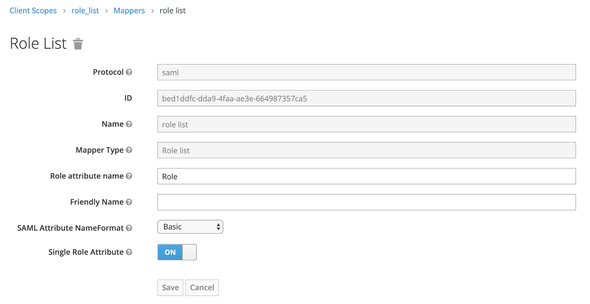
Go to the Mappers section and click on Edit to edit the default configured Mapper to send the Roles which are assigned to the User and the application as SAML Response
Make the Single Role Attribute to true and Save.
This is because, as default Keycloak server will send back the SAML Response with multiple Role attributes.
If we enable the Single Role Attribute, a single attribute named Role will be passed along with the associated roles as its child element.
and as one last step in the Keycloak server, we need to get the public certificate of the Keycloak server.
🔒 Keycloak Cert
Go to the Realm Settings under Configure and select the Keys tab. Click on the Certificate of the RS256 Algorithm and copy the cert value to a text editor.
Add the -----BEGIN CERTIFICATE----- and -----END CERTIFICATE----- to the copied value respectively at the beginning and at the end and save it as keycloak.cert
Following is the default Keycloak server’s Public Cert
-----BEGIN CERTIFICATE-----MIICmzCCAYMCBgFxK7QtbzANBgkqhkiG9w0BAQsFADARMQ8wDQYDVQQDDAZtYXN0ZXIwHhcNMjAwMzMwMTM0NzQwWhcNMzAwMzMwMTM0OTIwWjARMQ8wDQYDVQQDDAZtYXN0ZXIwggEiMA0GCSqGSIb3DQEBAQUAA4IBDwAwggEKAoIBAQCNH2xuTvfh4+GMhXnawavMi+Ro02XmtH5GDYR9MU+ERV1tm5ZqEDEERD7XPAMh5xjZn7iN0Wqp8x8j68Cy+k3Z8o3HanO/YShd+QBzU4JQ4VuhS8Kvn/KRiIUPA7NkD/o/TmopWWrxho/hj3HfJm82mKAMGKUsfMLOH8Iy+8Q106QrgeN0FWaseiqfBMAlaRrGDI4VsPAlHvT+JbL8NNgQB1gEIn6hhwFVbzHcofOXrRj1kpO9Vmd5VmdDtMorGrxrLyBhE4/opl22jvHgS8Ae3/R0kCiw81NZpxYieiz+kpUxDU95BG0twkwdMMJYt7YAm48qyD5knoOKmkLtLpqxAgMBAAEwDQYJKoZIhvcNAQELBQADggEBACLoLH+DiVVcngWGcGMdaLHjBt/DwmMHbfBlcwZZJ8q3W8vFB6CZQqVUtaEDPolj6FpdSzHUxZGEDuRINr1I/n9QIoofhgZNXuUpn0FMjH5RZa1kkvkxbTOOjSzuLh76gqpJchmbthUBPwrOtZ5oE8y2LenF4TzrZsDuEiSgwFtQNpbvoJbZ7iofVuV+C7evzwIZUmAI14jQ1EcPGJtb7aSzP2GkVH3zmXO48wLWUKcKXYIt7kJYiZPjwN0m0v/cwAI7Td1VtlA0hc4FIGhc8ouVoYd9DMDDklKJOgGeM9xK0nH6URtutQsmf+3cn19XA1VIS12C0eLkJpqK5Bw/lWY=-----END CERTIFICATE-----
👏 👏 👏 one domain is done.
Next, we will be moving to the WSO2 API Manager to configure an Identity Provider and a Service Provider to perform Federated SAML2 SSO.
WSO2 API Manager
✋ Identity Provider for Keycloak
Fire-up the WSO2 API Manager server and navigate to the Carbon Management console and login with your admin credentials.
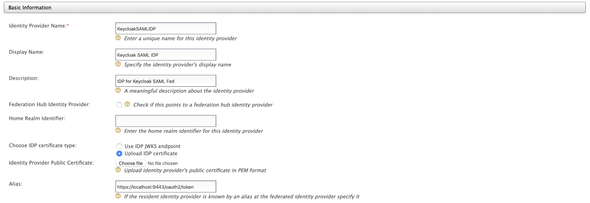
Click on Add under Identity Providers section and feed the following Basic Information
- Identity Provider Name:
KeycloakSAMLIDP - Display Name:
Keycloak SAML IDP
Select the IDP Certificate as Upload IDP Certificate and upload the keycloak.cert that we have created in the previous steps.
Next, expand the Claim Configurations and map our Role claim with the Internal Role claim.
Select the Define Custom Claim Dialect and click on Add Claim Mapping and enter the following
Role:http://wso2.org/claims/role
Select the Role in the Role Claim URI dropdown as well
Then, expand the Role Configuration accordion and enter the following to map the subscriber role of the Keycloak with the Internal/subscriber role of the API Manager
subscriber:Internal/subscriber
Next, click and expand the Federated Authenticators section and SAML SSO to configure the Federated authentication with our Keycloak Server
Put the following in the respective fields
- Enable SAML2 Web SSO:
true - Service Provider Entity ID:
wso2apim-saml(our client name in the Keycloak Server) - NameID Format:
urn:oasis:names:tc:SAML:1.1:nameid-format:unspecified - Identity Provider Entity ID:
http://localhost:8080/auth/realms/master(Entity ID can be found in the SAML Metadata of the Keycloak) - SSO URL:
http://localhost:8080/auth/realms/master/protocol/saml(SSO URL can be found in the SAML Metadata of the Keycloak)
Finally, expand the Just-In-Time Provisioning and select the Always Provision to User Store Domain to PRIMARY and Provision Silently
and Save.
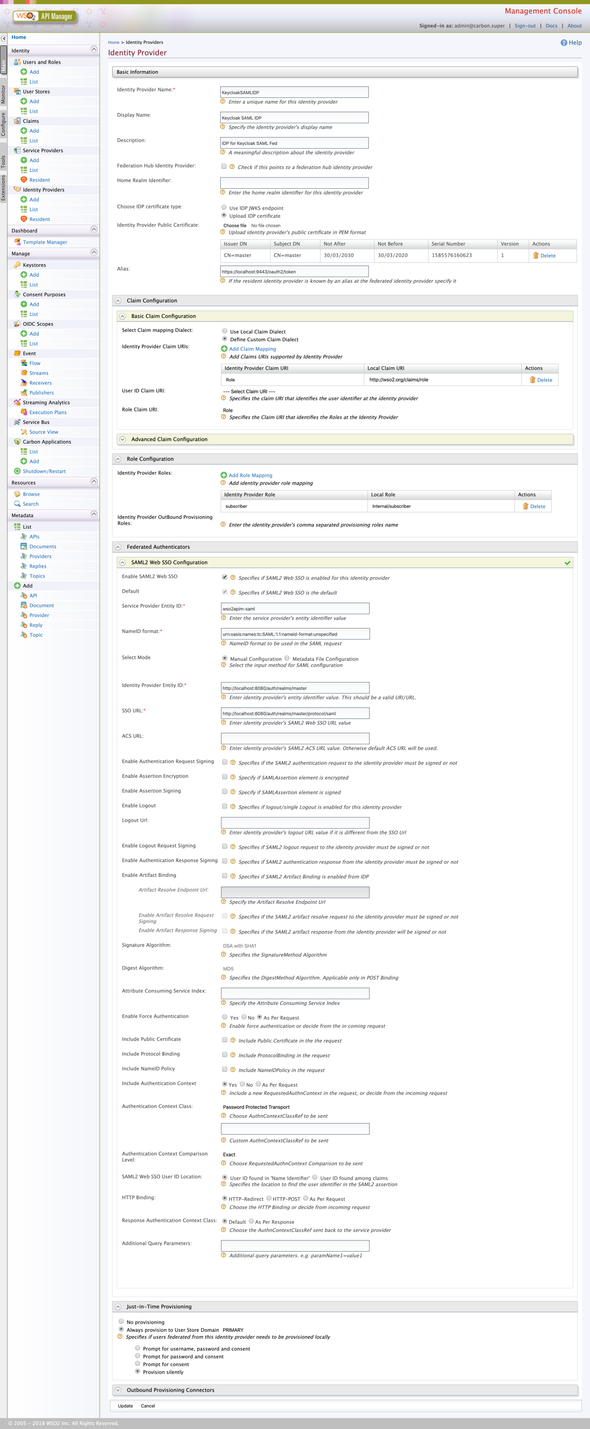
Attached is a full-snap of the configurations 😍 👌
✋ Service Provider
We are done with the Identity Provider configurations. Now, we have to create and register a Service Provider to SSO with the API Store node.
Log-in to the Carbon Management console and click on the Add under the Service Providers section and enter the following in the following screen
- Service Provider Name:
API_STORE
and Register.
On the following screen, expand the Inbound Authentication Configuration and select the OAuth/OpenID Connect Configuration to configure an OAuth app.
As default the WSO2 API Manager doesn’t support the SAML2 Web SSO Configurations in Service Provider. Hence, we are configuring an OAuth service provider to perform SSO with the API Store
On the prompted screen add the following
- Callback URL:
https://localhost:9443/store/jagg/jaggery_oidc_acs.jag
and Save.
Next, expand the Local & Outbound Authentication Configuration and select our KeycloakSAMLIDP as the Federated Authentication and Register (Save).
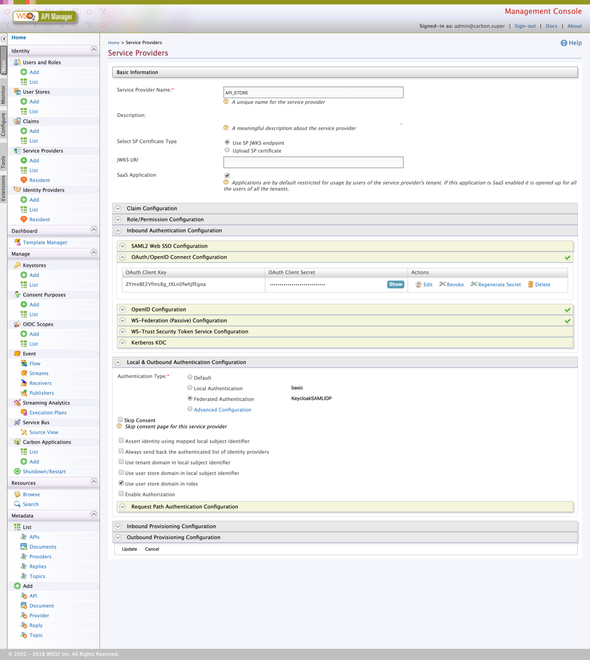
As always, I have attached the full-snap of the Service Provider configuration below 🤓
👉 Before moving to the next part, make a note or copy the client_id and the client_secret which are generated in our Service Provider as we need ’em when configuring the site.json.
✋ Store: Site.json
We are in the latter part of our demo flow.
As the last part, now we have to configure the site.json related to the Store node to communicate with our Service Provider.
The Store will start to communicate with our Service Provider and it will start to communicate with our Identity Provider and finally, our Identity Provider Federates with the Keycloak Server
Phew …. 🤓😅😅
Open-up the WSO2 API Manager’s directory and move to <apim>/repository/deployment/server/jaggeryapps/store/site/conf and open the site.json to configure the OIDC
Given below is a complete segment of the OpenID Connect configuration model in the site.json. You can refer to the following to configure your site.json in your environment.
Replace the Client ID and Client Secret with the credentials acquired from the API_STORE Service Provider
Also, if you notice, I have used
usernameClaimproperty in the OIDC Configuration to look for thesubclaim to acquire the username for our Store node. As default it will be referred to thepreferred_usernamefield. In SAML2 SSO Federation thepreferred_usernamefield is not guaranteed when provisioning the Users. Hence, it is required to configure theusernameClaimproperty in the OIDC configuration
"oidcConfiguration" : {"enabled": "true","issuer": "API_STORE","identityProviderURI": "https://localhost:9443/oauth2/token","authorizationEndpointURI": "https://localhost:9443/oauth2/authorize","tokenEndpointURI": "https://localhost:9443/oauth2/token","userInfoURI": "https://localhost:9443/oauth2/userinfo","jwksURI": "https://localhost:9443/oauth2/jwks","logoutEndpointURI": "https://localhost:9443/oidc/logout","authHttpMethod": "POST","usernameClaim": "sub","clientConfiguration" : {"clientId" : "Client ID","clientSecret" : "Client Secret","responseType" : "code","authorizationType" : "authorization_code","scope" : "phone email address openid profile","redirectURI" : "https://localhost:9443/store/jagg/jaggery_oidc_acs.jag","postLogoutRedirectURI" : "https://localhost:9443/store/","clientAlgorithm" : "RS256"}}
🎉 Voila!!! 🎉
We have successfully configured SAML2 Federated Authentication between Keycloak and Single Sign-On with OpenID Connect with API Store. Next, we will be doing a small test drive…
👏 👏 👏
Test Drive
Direct to the Store portal using https://localhost:9443/store/ and click on Sign-In.
You will be redirected to the Keycloak’s login page to enter the credentials. Enter the credentials of our Keycloak User and then allow the attributes on the consent screen to continue with the federation and provision of the Keycloak users to the WSO2 API Manager.
Login to the Carbon Management console of WSO2 API Manager and list the Users. If the Federation is successful and JIT Provisioned performed without any errors, you will be able to see our Keycloak User in the prompted list.
Happy Stacking !!!! 🤘 ✌️
