StackCheats
WSO2 API Manager & Auth0 OIDC SSO
Configure OIDC SSO between WSO2 API Manager v4.0.0 & Auth0
February 21, 2022
Greetings Everyone!!! 👋
In this medium, we will be walking through how to configure OIDC SSO between WSO2 API Manager and Auth0.
We will be using the WSO2 API Manager v4.0.0 for this demo
Let’s break in…
🔐 Auth0
Before continuing with the SSO configurations in the WSO2 API Manager, there are a few configurations and rules that need to be added to the Auth0 platform to experience the expected outcome.
If you already have an Auth0 account, you can move on to the next steps, if you are not, then navigate to Auth0 (https://auth0.com) and register for a trial account to continue with this demo.
✋ OIDC Client Registration
Let’s start by creating and configuring an Application in Auth0.
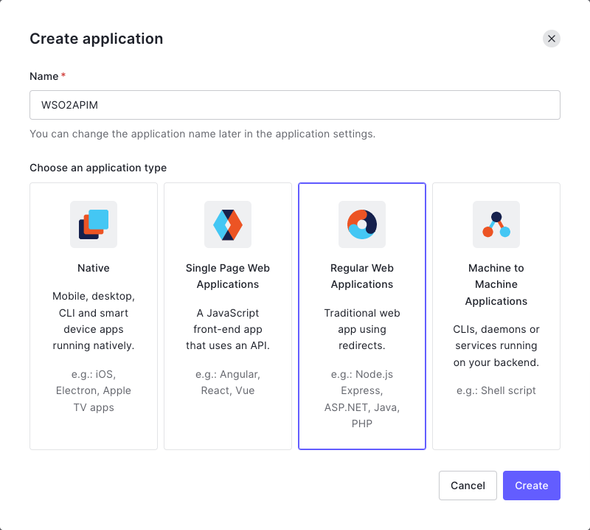
Once you have successfully logged in to the Auth0 dashboard, expand the Applications menu from the side-bar and click on Applications, and Create Application. Fill the following
- Name:
WSO2APIM - Choose an application type:
Regular Web Applications
and Create.
On the next page, move to Settings tab view, and provide the following inputs
- Allowed Callback URLs:
https://localhost:9443/commonauth
and Save Changes.
Next, expand the Advanced Settings, and move to Endpoints tab to gather all OIDC related endpoints of the Auth0 application to configure with the WSO2 API Manager.
✋ User Registration
We have now, successfully configured an application in Auth0 for our OIDC SSO flow. Next, we’ll register a demo user and a role in the Auth0 platform.
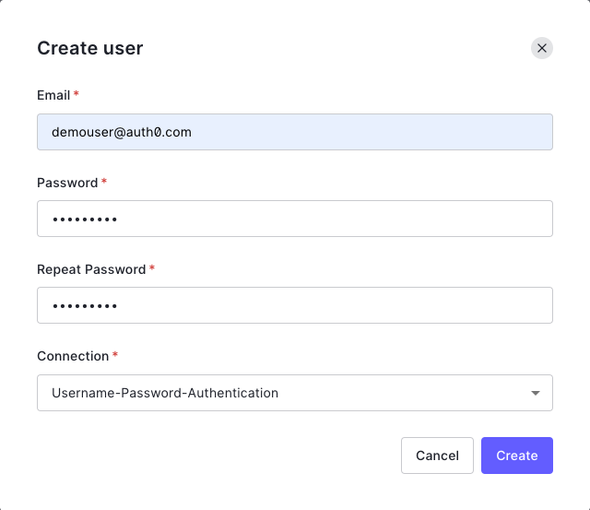
Expand the User Management menu from the sidebar and click on Users > Create User. Create a user with the following details
- Email:
demouser@auth0.com - Connection:
Username-Password-Authentication
and click on Create.
On the next view, edit the Name field and provide Demo User as the value.
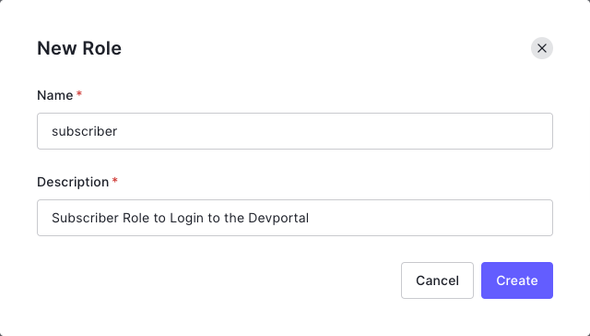
Next, expand the User Management from the side navigation bar and click on Roles to create a role in the Auth0 platform. Click on Create Role and add the following
- Name:
subscriber - Description:
Subscriber Role to Login to the Devportal
and Create.
Navigate to the Users tab, and click on Add Users. Select the user that we registered previously and click on Assign to assign the subscriber role to our user.
✋ Rules to add Roles
As the next step, we are going to create a Rule in the Auth0 to include the Role details of the User in the ID token. To perform this, navigate to Auth Pipeline section and click on Rules.
Click on Create and select Empty Rule and provide the following as inputs
- Name: Add Roles to User ID Token
- Scriptfunction addRoles(user, context, callback) {const namespace = 'http://sample.net';const assignedRoles = (context.authorization || {}).roles;let idTokenClaims = context.idToken || {};let accessTokenClaims = context.accessToken || {};idTokenClaims[`${namespace}/roles`] = assignedRoles;accessTokenClaims[`${namespace}/roles`] = assignedRoles;context.idToken = idTokenClaims;context.accessToken = accessTokenClaims;callback(null, user, context);}
and Save changes.
The rule will get applied to all necessary flows and applications in the Auth0 platform. With this, we have now completed configuring the Auth0 platform to perform OIDC SSO. Now, let’s start configuring the other end, WSO2 API Manager.
🌐 WSO2 API Manager
Let’s start running a WSO2 API Manager v4.0.0 pack locally and then configure the SSO with Auth0 for the Devportal.
If you haven’t already run a WSO2 API Manager in your environment, download the distribution from here and start the server by executing sh api-manager.sh command from the <apim_home>/bin directory.
Once the server is started, navigate to https://localhost:9443/devportal and click on Sign-in to auto-create the Service Provider entries.
✋ Identity Provider
First, let’s register an Identity Provider in the API Manager server to represent the Auth0.
Open up your favourite browser, go to the Carbon Management console of the API Manager server by hitting to https://localhost:9443/carbon and logging in with the admin credentials.
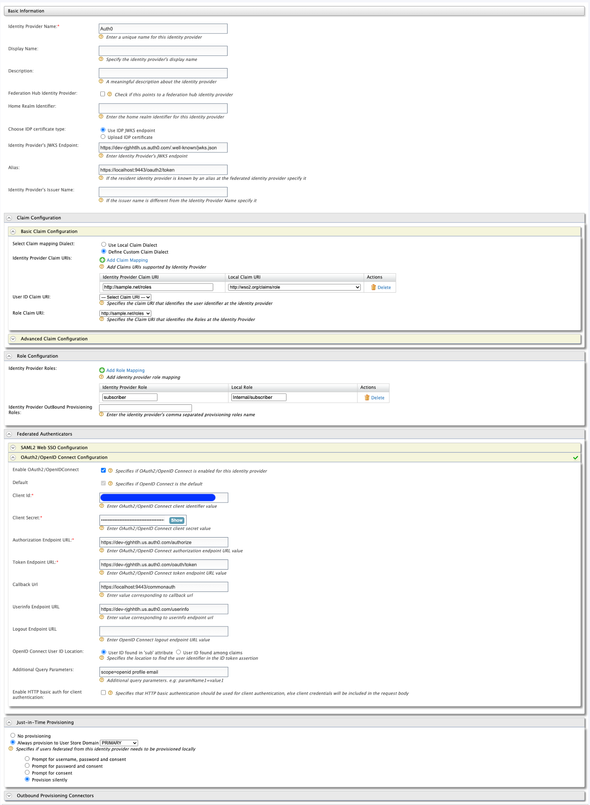
Once logged in, click on Add under the Identity Providers section. Create an IDP with the following
- Identity Provider Name:
Auth0 - Display Name:
Auth0 - Identity Provider’s JWKS Endpoint: Enter the
JSON Web Key Set URLof the Application, we created in Auth0 (ex:https://dev-.....auth0.com/.well-known/jwks.json)
Expand the Claim Configuration > Basic Claim Configuration and add a Claim Mapping for the roles. Select Define Custom Claim Dialect and add the following claim mappings by clicking on Add Claim Mapping
http://sample.net/roles:http://wso2.org/claims/role
Next, expand the Role Configuration > Add Role Mapping and add the following
subscriber:Internal/subscriber
And choose the Role Claim URI as http://sample.net/roles.
Then, expand the Federated Authenticators > OAuth2/OpenID Connect Configuration and perform the following
- Enable OAuth2/OpenIDConnect:
true - Default:
true - Client ID: Enter the Client ID of the
WSO2APIMApplication - Client Secret: Enter the Client Secret of the
WSO2APIMApplication - Authorization Endpoint URL: Enter the
OAuth Authorization URLcaptured from Auth0 - Token Endpoint URL: Enter the
OAuth Token URLcaptured from Auth0 - Userinfo Endpoint URL: Enter the
OAuth User Info URLcaptured from Auth0 - Additional Query Parameters:
scope=openid profile email
Next, expand the Just-in-Time Provisioning section and perform the following
- Always provision to User Store Domain:
PRIMARY - Provision silently:
true
and Register.
Attached below is the IDP configurations of Auth0 configured in the WSO2 API Manager server.
✋ Devportal Service Provider
Now, let’s open up the auto-created Devportal Service Provider by going to Service Providers > List > apim_devportal > Edit.
Expand the Local & Outbound Authentication Configuration and perform the following
- Authentication Type:
Federated Authentication:Auth0 - Assert Identity using mapped local subject identifier:
true
and click on Update.
🎉 Voila!!! 🎉
We have successfully configured OIDC SSO between WSO2 API Manager and Auth0. As the final step, let’s perform a few testing and verify the flow
Open up your favourite browser and navigate to https://localhost:9443/devportal. Click on Sign-in, this will direct you to the Auth0’s login page to log in with the user that we have created for this demo, demouser@auth0.com. Provide the credentials and proceed with the sign-in flow.
Once the login flow is successful, you will be redirected back to the Devportal’s page and will be signed in with the user that we have registered in the Auth0, along with the same user provisioned in the WSO2 API Manager side.
Happy Stacking!!! ✌️


