StackCheats
SAML SSO With Passport
WSO2 Identity Server: SAML SSO & Passport SAML
July 20, 2019
Intro
This post narrates on how-to enable and register a service provider for SAML SSO using WSO2 Identity Server and to develop a simple Express-based web application with Passport-SAML component to support and authenticate the users via SAML SSO.
Security Assertion Markup Language (SAML) is an XML-based framework for authentication and authorization between a Service Provider and an Identity Provider. SAML is a standard Single-Sign-On (SSO) format. Authentication information is exchanged through digitally signed XML documents.
Implementation
Express Application
Create an express application by executing npm init command, and provide all necessary properties to start the development.
Install all below-listed dependencies by either running npm install <module> --save command or by replacing the dependencies object with the values.
A complete package.json is given below.
| { | |
| "name": "expresssaml", | |
| "version": "1.0.0", | |
| "description": "Express Application with SAML SSO", | |
| "main": "server.js", | |
| "scripts": { | |
| "test": "echo \"Error: no test specified\" && exit 1" | |
| }, | |
| "author": "athiththan11", | |
| "homepage": "https://github.com/athiththan11/Passport-SAML-WSO2", | |
| "keywords": [ | |
| "wso2-saml-sso", | |
| "passport-saml" | |
| ], | |
| "license": "ISC", | |
| "dependencies": { | |
| "body-parser": "1.19.0", | |
| "dotenv": "8.0.0", | |
| "ejs": "2.6.2", | |
| "express": "4.17.1", | |
| "express-session": "1.16.2", | |
| "passport": "0.3.2", | |
| "passport-saml": "0.15.0" | |
| }, | |
| "devDependencies": {} | |
| } |
Create a Javascript file named server.js in the root directory of our express application with the below-given code-segments.
Note: EJS template implementations are not covered here
Check out the complete implementation of our express application at the end of this blog followed by a GitHub repo. The implementation contains simple EJS templates to render the pages and outputs.
| require('dotenv').config(); | |
| var path = require('path'); | |
| var fs = require('fs'); | |
| var express = require('express'); | |
| var session = require('express-session'); | |
| var passport = require('passport'); | |
| var saml = require('passport-saml').Strategy; | |
| var bodyParser = require('body-parser'); | |
| var userProfile; | |
| var app = express(); | |
| app.set('views', path.join(__dirname, 'views')); | |
| app.set('view engine', 'ejs'); | |
| app.use(express.static(path.join(__dirname, 'public'))); | |
| app.use(bodyParser.urlencoded({ extended: true })); | |
| app.use(session({ secret: process.env.SESSION_SECRET })); | |
| app.use(passport.initialize()); | |
| app.use(passport.session()); | |
| passport.serializeUser((user, done) => { | |
| done(null, user); | |
| }); | |
| passport.deserializeUser((user, done) => { | |
| done(null, user); | |
| }); | |
| // saml strategy for passport | |
| var strategy = new saml( | |
| { | |
| entryPoint: process.env.SAML_ENTRYPOINT, | |
| issuer: process.env.SAML_ISSUER, | |
| protocol: process.env.SAML_PROTOCOL, | |
| logoutUrl: process.env.SAML_LOGOUTURL | |
| }, | |
| (profile, done) => { | |
| userProfile = profile; | |
| done(null, userProfile); | |
| } | |
| ); | |
| passport.use(strategy); | |
| var redirectToLogin = (req, res, next) => { | |
| if (!req.isAuthenticated() || userProfile == null) { | |
| return res.redirect('/app/login'); | |
| } | |
| next(); | |
| }; | |
| app.get('/app', redirectToLogin, (req, res) => { | |
| res.render('index', { | |
| title: 'Express Web Application', | |
| heading: 'Logged-In to Express Web Application' | |
| }); | |
| }); | |
| app.get( | |
| '/app/login', | |
| passport.authenticate('saml', { | |
| successRedirect: '/app', | |
| failureRedirect: '/app/login' | |
| }) | |
| ); | |
| app.get('/app/logout', (req, res) => { | |
| if (req.user == null) { | |
| return res.redirect('/app/home'); | |
| } | |
| return strategy.logout(req, (err, uri) => { | |
| req.logout(); | |
| userProfile = null; | |
| return res.redirect(uri); | |
| }); | |
| }); | |
| app.get('/app/failed', (req, res) => { | |
| res.status(401).send('Login failed'); | |
| }); | |
| app.post( | |
| '/saml/consume', | |
| passport.authenticate('saml', { | |
| failureRedirect: '/app/failed', | |
| failureFlash: true | |
| }), | |
| (req, res) => { | |
| // saml assertion extraction from saml response | |
| // var samlResponse = res.req.body.SAMLResponse; | |
| // var decoded = base64decode(samlResponse); | |
| // var assertion = | |
| // ('<saml2:Assertion' + decoded.split('<saml2:Assertion')[1]).split( | |
| // '</saml2:Assertion>' | |
| // )[0] + '</saml2:Assertion>'; | |
| // var urlEncoded = base64url(assertion); | |
| // success redirection to /app | |
| return res.redirect('/app'); | |
| } | |
| ); | |
| app.post('/app/home', (req, res) => { | |
| res.render('home', { | |
| title: 'Express Web Application', | |
| heading: 'Express Web Application' | |
| }); | |
| }); | |
| app.listen(process.env.PORT || 3000); |
Passport
Passport is authentication middleware for Node.js and can be used with any Express-based web applications.
Passport has a comprehensive set of strategies to support different authentication mechanisms with different vendors.
For this implementation, we will be using Passport-SAML (which is an open-built strategy for SAML 2.0 authentication flows) strategy with our express web application to authenticate users.
Given below is a simple Passport-SAML strategy configuration …
| var passport = require('passport'); | |
| var saml = require('passport-saml').Strategy; | |
| // saml strategy for passport | |
| var strategy = new saml( | |
| { | |
| entryPoint: <provide SAML entry point url : https://localhost:9443/samlsso>, | |
| issuer: <provide SAML issuer name : SampleExpressApp>, | |
| protocol: <provide the protocol used : http://>, | |
| logoutUrl: <provide the logout url : https://localhost:9443/samlsso> | |
| }, | |
| (profile, done) => { | |
| // your body implementation on success | |
| } | |
| ); | |
| // register the strategy with passport | |
| passport.use(strategy); |
Configurations
WSO2 Identity Server
Create a new Service Provider in the WSO2 Identity Server to register our express application as one. Follow the given step by step guide to create new Service Provider and to register our express application enabling SAML SSO.
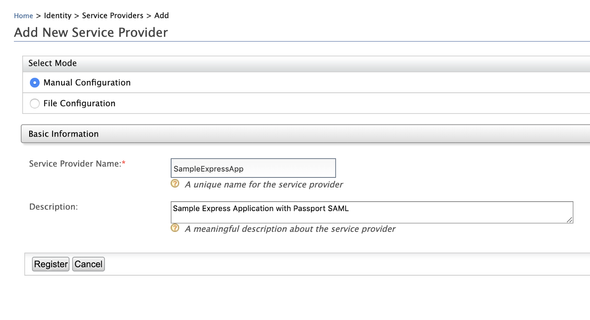
Navigate to Main (Tab) -> Identity (Section) -> Service Providers (Sub-section) and select Add. The management console will display you the following screen to add a new service provider.
Provide …
- Service Provider Name: SampleExpressApp
- Description: Any valid description of the service provider
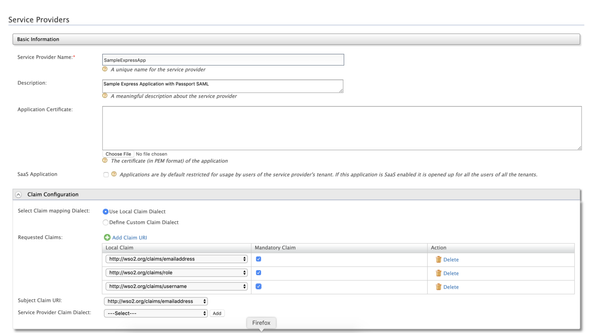
And click Register to register and create a new service provider. Afterward, the management console will display you the following screen to configure claim configuration, inbound authentication configurations and etc.
Expand the Claim Configurations (accordion) to configure wanted claims and subject claim URI. We will be using the Local Claim Dialect as the Claim mapping Dialect.
You can add all your wanted (requested claims) by clicking on the Add Claim URI button and selecting one from the drop-down menu
For the demo, we will be selecting the following claims
http://wso2.org/claims/emailaddresshttp://wso2.org/claims/usernamehttp://wso2.org/claims/role
And choose http://wso2.org/claims/emailaddress as the Subject Claim URI.
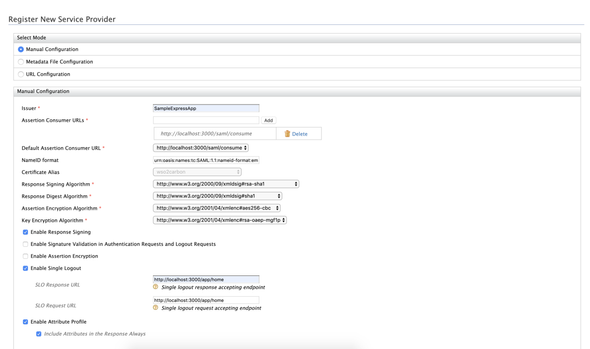
Next, expand the Inbound Authentication Configuration (accordion) and click on SAML2 Web SSO Configuration and select Configure to configure SAML web SSO for our implemented express application.
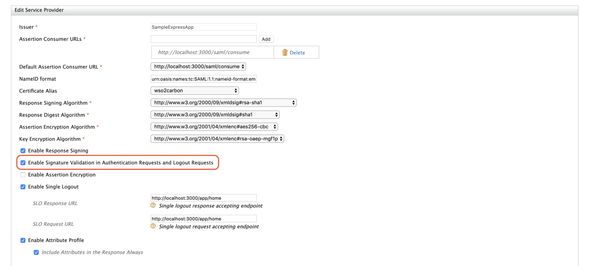
Configure the SAML SSO as follows …
- Issuer:
SampleExpressApp - Assertion Consumer URLs:
http://localhost:3000/saml/consume - Enable Response Signing:
True - Enable Signature Validation in Authentication Requests and Logout Requests: False
To enable signature validate in both authentication requests and logout requests, please refer the
Certificates and Signingsection.
- Enable Single Logout:
True - SLO Response URL:
http://localhost:3000/app/home - SLO Request URL:
http://localhost:3000/app/home - Enable Attribute Profile:
True - Include Attributes in the Response Always:
True
And select Register to register your SAML SSO configurations and the management console will prompt you to the previous configuration screen. Leave other configurations as it is and click on Update.
Expand Local & Outbound Authentication Configuration and select Default as the Authentication Type and enable Use user store domain in roles configuration.
Express Application
After implementing the express application, create a .env file in the root path and enter the following properties.
Change the
SAML_ENTRYPOINTandSAML_LOGOUTURLproperties if the IP-address and ports are different from default configurations
SESSION_SECRET="a well secured secret"SAML_ENTRYPOINT="https://localhost:9443/samlsso"SAML_ISSUER="SampleExpressApp"SAML_PROTOCOL="http://"SAML_LOGOUTURL="https://localhost:9443/samlsso"WSO2_ROLE_CLAIM="http://wso2.org/claims/role"WSO2_EMAIL_CLAIM="http://wso2.org/claims/emailaddress"
Certificates and Signing
To validate both authentication request and logout requests, we need to add relevant application certificates and private keys in both Identity Server and in our express application.
For this demo, we will be using the default wso2carbon key-store to generate application certificates and private keys. The wso2carbon key-store can be found inside <IS_HOME>/repository/resources/security directory
To export the certificate from the key-store, execute the following command from the security folder
keytool -export -keystore wso2carbon.jks -alias wso2carbon -file wso2carbon.crt
The above-generated certificate will be in binary format. Use the following command to convert the above binary encoded certificate to PEM encoded certificate
openssl x509 -inform der -in wso2carbon.crt -out wso2carbon.pem
Copy the generated
wso2carbon.pemfile to another easily accessible folder
Configure: WSO2 Identity Server
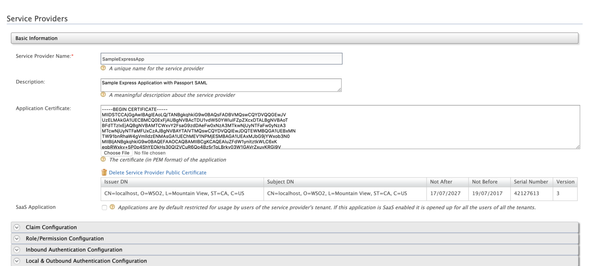
Open the Identity Server and navigate to Main (Tab) -> Identity (Section) -> Service Providers (Sub-section) -> select List and Edit (our service provider).
In the Basic Information panel, select the Choose File button which is associated with the Application Certificate field. Choose the above-created wso2carbon.pem file and open.
Next, expand the Inbound Authentication Configuration (accordion) and click on SAML2 Web SSO Configuration and select Edit to update our SAML web SSO configurations. Enable signature validation in authentication requests and logout requests.
Click Update and Update again to update the service provider configurations.
Configure: Passport & Express App
Generate a private certificate for our express application. Execute the following commands to generate a private certificate from the default wso2carbon key-store.
Use
wso2carbonas the password for any password-prompts.
keytool -importkeystore -srckeystore wso2carbon.jks -destkeystore wso2carbon.p12 -deststoretype PKCS12 -srcalias wso2carbon -deststorepass wso2carbon -destkeypass wso2carbon-------------openssl pkcs12 -in wso2carbon.p12 -nodes -nocerts -out private-key.pem
Create folder named security in the root path of our express application and place both the generated private-key.pem and wso2carbon.pem inside.
After placing the certificates, update the passport SAML strategy as follows
| var passport = require('passport'); | |
| var saml = require('passport-saml').Strategy; | |
| // saml strategy for passport | |
| var strategy = new saml( | |
| { | |
| entryPoint: <provide SAML entry point url : https://localhost:9443/samlsso>, | |
| issuer: <provide SAML issuer name : SampleExpressApp>, | |
| protocol: <provide the protocol used : http://>, | |
| logoutUrl: <provide the logout url : https://localhost:9443/samlsso>, | |
| privateCert: fs.readFileSync('./security/private-key.pem', 'utf-8'), | |
| cert: fs.readFileSync('./security/wso2carbon.pem', 'utf8') | |
| }, | |
| (profile, done) => { | |
| // your body implementation on success | |
| } | |
| ); | |
| // register the strategy with passport | |
| passport.use(strategy); |
Run & Test
Run
Run the express application by executing the given command from the root folder
npm start
Also, start your WSO2 Identity Server instance using the following command from your <IS_HOME>/bin directory
sh wso2server.sh
Test
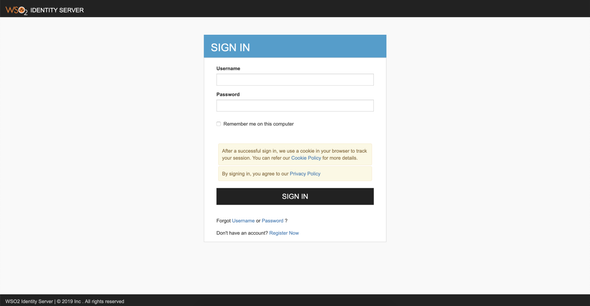
Open your favorite browser and navigate to http://localhost:3000/app. The browser will redirect to the WSO2 Identity Server’s sign-in page to enter the login credentials.
For this demo, you can use
adminas both the username and password to sign in with the WSO2 Identity Server
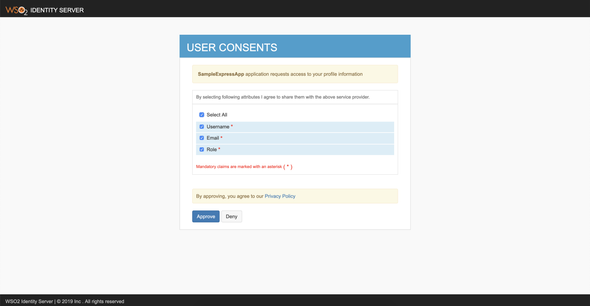
After presenting the login credentials, the Identity Server will prompt a user consent page to either approve or deny requested claims. Choose Select All and Approve.
After successful authentication, the browser will redirect and displays you the logged-in page of our express application.
Navigate to http://localhost:3000/app/logout to log-out from the SAML SSO session.
GitHub
Passport SAML WSO2
A sample express application with Passport-SAML for WSO2 SAML2 SSO
