StackCheats
Replace H2 with Postgres
WSO2 Identity Server (5.7): Replace Default H2 DB with Postgres DB
August 03, 2019
Docker: Postgres
Pull
Prerequisites: Docker installed in your environment. You can follow the Docker docs to get it done.
Follow the given steps to set up Postgres using Docker in your dev environments. For this demo, we will be using Postgres - 9.6.14 and WSO2 Identity Server 5.7.
Start the Docker service and execute the following command to pull the Postgres (9.6.14) image from DockerHub
docker pull postgres:9.6.14
Run
After a successful pull, execute the below command to create and run a docker container for our pulled Postgres image. Replace the <CONTAINER_NAME> tag with your preferred name or use postgres-9.6.14 as the default value.
You can change the Postgres password by changing the
POSTGRES_PASSWORDvalue fromhydrogento any preferred secured password
docker run --name <CONTAINER_NAME || postgres-9.6.14> -e POSTGRES_PASSWORD=hydrogen -p 5432:5432 -d -v $HOME/docker/volumes/postgres:/var/lib/postgresql postgres:9.6.14
Basic commands to
startandstopa Docker container
docker start <CONTAINER_NAME>to start a containerdocker stop <CONTAINER_NAME>to stop a running container
PSQL Terminal
Use the following command to hop into the PSQL terminal session.
docker exec -ti <CONTAINER_NAME || postgres-9.6.14> psql -h localhost -U postgres
Configurations
Postgres
To replace the default packaged H2 database with Postgres, initially, we have to create the databases and tables in Postgres. Find and execute the following PostgreSQL scripts to create and set up all necessary tables and indexes.
You can use either any database tools like DBeaver (Jump to DBeaver) or you can straightaway execute them using PSQL terminal (Jump to PSQL)
<IS>/dbscripts/postgresql.sql<IS>/dbscripts/identity/postgresql.sql<IS>/dbscripts/identity/uma/postgresql.sql<IS>/dbscripts/identity/stored-procedures/postgre/postgresql.sql<IS>/dbscripts/consent/postgresql.sql
Start the Postgres container (if not started before) using the following command
docker start postgres-9.6.14
PSQL
Execute the following command to enter the PSQL terminal session and run the create query to create a database named wso2postgres
docker exec -ti postgres-9.6.14 psql -h localhost -U postgres
create database wso2postgres;
After successful creation, try to connect to the wso2postgres database using the following command
\c wso2postgres;
Next, quite the terminal session using \q command and copy the dbscripts folder from the <IS_HOME> path to our postgres-9.6.14 container volume to execute all related scripts using the Docker PSQL terminal.
docker cp <IS_HOME>/dbscripts postgres-9.6.14:/
and run the following commands one by one to execute the scripts
docker exec -ti postgres-9.6.14 psql -h localhost -U postgres -d wso2postgres -f /dbscripts/postgresql.sql-----docker exec -ti postgres-9.6.14 psql -h localhost -U postgres -d wso2postgres -f /dbscripts/identity/postgresql.sql-----docker exec -ti postgres-9.6.14 psql -h localhost -U postgres -d wso2postgres -f /dbscripts/identity/uma/postgresql.sql-----docker exec -ti postgres-9.6.14 psql -h localhost -U postgres -d wso2postgres -f /dbscripts/identity/stored-procedures/postgre/postgresql.sql-----docker exec -ti postgres-9.6.14 psql -h localhost -U postgres -d wso2postgres -f /dbscripts/consent/postgresql.sql
After a successful connection, execute the above-mentioned SQL scripts to create related tables and indexes. But, before executing them, we have to copy the dbscripts folder to the related container volume to execute the script using PSQL terminal. Execute the following command to copy the dbscripts folder from the <IS_HOME> path to our postgres-9.6.14 container volume.
DBeaver
Prerequisites: DBeaver installed in your environment. You can follow the DBeaver site.
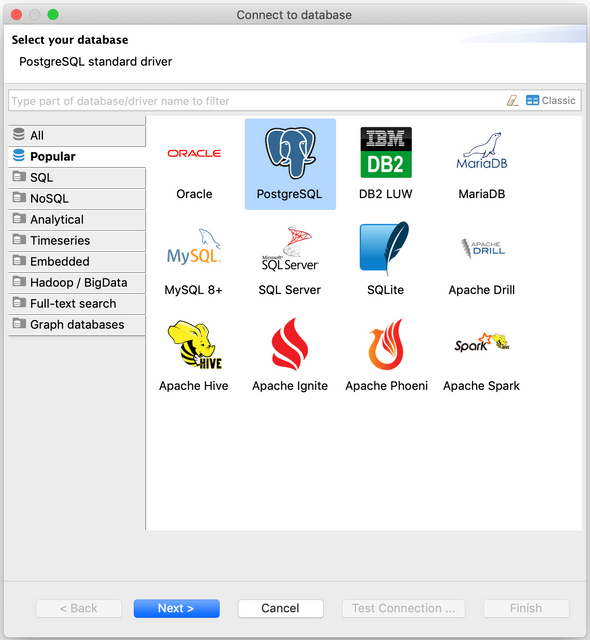
Open DBeaver and create a new database connection. Select PostgreSQL from the list and click Next.
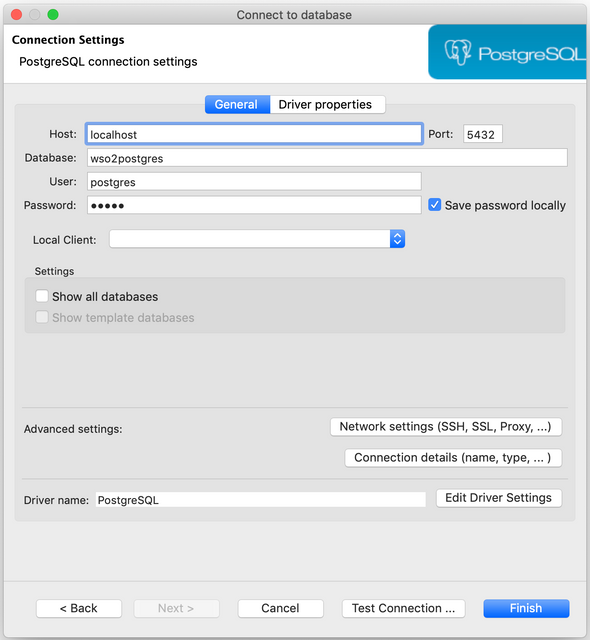
Enter wso2postgres for the Database field and use hydrogen as Password.
Please change and use related values for the
Host,Port,Database,UserandPasswordfields if those are different from mentioned default values.If you have not installed any PostgreSQL driver for DBeaver, it will prompt you to follow a couple of instructions to install necessary drivers to work with Postgres databases and connections
Click on Test Connection to test the database connection and if successful then click on Finish to finish the connection configuration process. The created connection will be listed under the Database Navigator panel (on the left-side navigation panel). Navigate to File -> Open File ... and select and open the above-listed PostgreSQL scripts in the DBeaver.
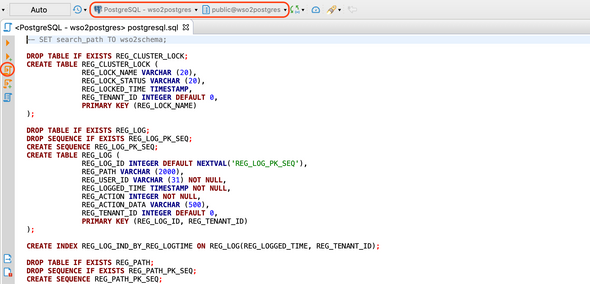
Select the database connection and the Postgres schema if not selected by default and click Execute SQL Script to execute the script. Do this for all above-mentioned PostgreSQL scripts.
WSO2 Identity Server
Below described steps and guides are based on fresh-pack installation. If you have any pre-stored data inside the H2 database, then you have to migrate them to the new data-source which is not covered in this topic.
After setting up the databases, now we have to install the Postgres JDBC connector (driver) for our WSO2 Identity Server. Download the Postgres driver from here, copy and place the jar file inside the <IS>/repository/components/lib directory.
Next, we have to configure our database connection settings in the Identity Server to connect to our Postgres source. Make changes to the following XML files to swap the connection from default H2 database to our Postgres database.
<IS>/repository/conf/datasources/master-datasources.xml<IS>/repository/conf/identity/identity.xml<IS>/repository/conf/registry.xml
Moreover, We will also be swapping the user store from the default LDAP server to the JDBC store
Replace and change the
host,port,username, andpasswordsegments with respective values if different.
Master DataSource
Add the following data source configuration below the default H2 configuration.
<!-- master-datasources.xml --><datasource><name>WSO2_CARBON_POSTGRES_DB</name><description>The datasource used for registry and user manager</description><jndiConfig><name>jdbc/WSO2CarbonPostgresDB</name></jndiConfig><definition type="RDBMS"><configuration><url>jdbc:postgresql://localhost:5432/wso2postgres</url><username>postgres</username><password>hydrogen</password><driverClassName>org.postgresql.Driver</driverClassName><maxActive>80</maxActive><maxWait>60000</maxWait><minIdle>5</minIdle><testOnBorrow>true</testOnBorrow><validationQuery>SELECT 1; COMMIT</validationQuery><defaultAutoCommit>true</defaultAutoCommit><validationInterval>30000</validationInterval></configuration></definition></datasource>
Identity
Change the data-source in repository/conf/identity/identity.xml with the Postgres JNDI configuration name.
<!-- identity.xml --><JDBCPersistenceManager><DataSource><!-- Include a data source name (jndiConfigName) from the set of datasources defined in master-datasources.xml --><!-- <Name>jdbc/WSO2CarbonDB</Name> --><Name>jdbc/WSO2CarbonPostgresDB</Name></DataSource>...
Registry
The following changes are made to mount the registries with our newly created Postgres data-source.
Don’t change the default
wso2registryconfigurations unless if you want to. Add new registry mounting configurations below the default configurations.
<!-- registry.xml --><dbConfig name="wso2registry"><dataSource>jdbc/WSO2CarbonDB</dataSource></dbConfig><dbConfig name="govregistry"><dataSource>jdbc/WSO2CarbonPostgresDB</dataSource></dbConfig><remoteInstance url="https://localhost:9443/registry"><id>gov</id><cacheId>postgres@jdbc:postgresql://localhost:5432/wso2postgres</cacheId><dbConfig>govregistry</dbConfig><readOnly>false</readOnly><enableCache>true</enableCache><registryRoot>/</registryRoot></remoteInstance><mount path="/_system/governance" overwrite="true"><instanceId>gov</instanceId><targetPath>/_system/governance</targetPath></mount><mount path="/_system/config" overwrite="true"><instanceId>gov</instanceId><targetPath>/_system/config</targetPath></mount>
User Management
Below described steps are to change the default LDAP user-store to JDBC user-store. You can skip the following changes if you want to keep the default LDAP user-store as out-of-the-box.
Comment the existing WSO2CarbonDB data source property tag and place the WSO2CarbonPostgresDB property tag inside the <Configuration> element as described below
<Configuration>...<!-- <Property name="dataSource">jdbc/WSO2CarbonDB</Property> --><Property name="dataSource">jdbc/WSO2CarbonPostgresDB</Property></Configuration>
Further, comment the LDAP user store manager configurations and uncomment the JDBC user store manager. This will route our default LDAP user store with JDBC user store.
Run & Test
Start the WSO2 Identity Server by navigating to the <IS>/bin folder and execute the following command based on your environment
# linux env./wso2server.sh# windows env./wso2server.bat
The server will start and configure the platform to work with new configurations. After a successful startup, bring up your favorite browser and navigate to https://localhost:9443/carbon and enter admin as both username and password.


